The carputer project
.. Challenges, solutions, lessons learned ..
June 2007 - Researching, planning, experimenting

I'm putting a computer in my 1992 Opel Calibra 2.0i.
"Because I can".
So here are the ground rules:
- Budget! If a "creative" solution based on existing components will work, I'm not buying the "proper" part.
- Windows XP. I want the flexibility to run my own .NET apps.
- Solid state storage only for reliability and silence. No harddrives with moving parts.
- Quick booting.
- Touchscreen. It's sexy.
- Reasonable default operation. It'll mostly be used for playing music, and should do so when i start my car, without even needing to turn on the screen or pressing anything.
- Reversible installation. It shouldn't take long to pull it all out and return to stock.
My existing headunit would stay, as it works fine, and I like having a rotary volume control. It has an aux input for the carputer.
Time was spent fishing around for a few components I didn't already have, and would need, like the touchscreen and GPS module. As for the rest, I gathered loads of spare computer parts to have as many options as possible.
Hardware:
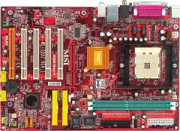
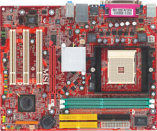
I ended up with 3 potential MSI mainboards: K8M Neo-V, K8MM-V, and K8MM3-V. One of them would be used with an AMD Sempron 2800+ and a gig of Corsair memory with some funky LEDs on top. For storage, I had a 4gb Corsair Flash Voyager USB stick. In retrospect a CF card with IDE-adapter might've been a better choice, but that would've been breaking the first rule.
Software:
As mentioned, Windows XP was the OS of choice. I started tweaking a regular XP install with help from the
mp3car.com forum,
ngine.de and
Dietmar at 911cd.net.
In the middle of the process, I learnt about
XP Embedded, which has native support for USB booting and other features that seemed more appropriate for this kind of project. Embedded it is then.
XP Embedded applicable features:
- Native USB boot. Sweet!
- EWF (Enhanced Write Filter). Apparently, flash devices wear out after a certain amount of write operations. EWF basically write protects your device, and re-routes all writing to RAM to simulate a normal environment. This also means I can kill the power, and it will boot up next time as if nothing happened.
- HORM (Hibernate Once Resume Many). Exactly what it says. Use in conjunction with EWF. Hibernate in a "perfect" state, and it will resume from that hibernation image on every bootup ( = fast).
Slight problem though: HORM won't work with USB boot according to MS, and I never found a way around this. Fair enough, EWF alone worked well, and would let me kill power to the computer and still have it boot nicely the next time.
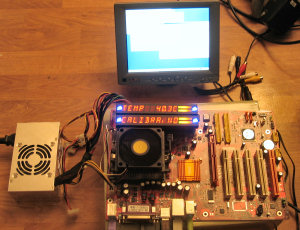
Different combinations of hardware and about 10 different XPE images was experimented with for way too many hours..
June/July 2007 - Mainboard problems and choices
The original plan was to use the on-board soundcards which all 3 mainboards had. However:
The K8M Neo-V had two problems:
- It's a fullsize ATX board, and takes up lots of space
- The onboard soundcard is probably faulty.
To be exact; it had a "tinny" sound, and didn't reproduce any low frequencies. I went through different drivers (from MSI, from Realtek and from Nvidia) without any luck, as well as fiddling with EQ settings in windows and drivers, bios settings, jumpers, you name it. No luck. MSI couldn't resolve this either so I gave up eventually.
The K8MM-V and K8MM3-V were almost identical, had working sound, and a small form factor, but both faced another problem:
- Boot times were HORRIBLE!
The exact difference was as follows:
On the Neo-V board, booting would go from bios POST, via a blank screen for a few seconds, then directly into the graphical part of XP's boot process.
On the K8MM's, booting would go from bios POST, via a black and white "text mode" progress bar that XP sometimes displays, then after a long time, the graphical part would begin.
Different images from XP embedded and regular XP was tried, to no avail. Bios settings were fiddled with, MSI was contacted, there was no way to resolve this.
I even made a little video to demonstrate the problem,
which you'll find here. If anyone knows a solution to this, or can tell me why that progress bar shows up only on some installations, please let me know, as I'm still curious.
In the end, I went with the Neo-V board and an icemat USB soundcard, which worked perfectly.
Added bonus: since I was already planning on putting USB ports in the dash, the icemat could be plugged in there, and I wouldn't need another (noise prone) audio cable to the back!
July 2007 - Purchases
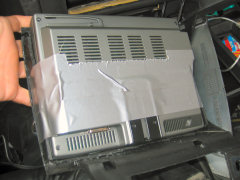
My first actual purchase: I ordered a Lilliput 8" touchscreen!
By now, I'd settled on using an inverter with a regular PSU, in case I'd need 220v for anything else later, so a cheap inverter was ordered as well.
The other option would've been a DC-DC converter, but they cost more, are less flexible, and with EWF I'd be able to just cut power anyway, without needing the "controlled shutdown"-functions that most DC-DC converters offer.
Some plexiglass and epoxy glue was also purchased for building the computer housing.
July 2007 - Lilliput hooked up
.. and it works great, touchscreen and all!
Native resolution is 640x480, but it also downscales 1024x768 pretty nicely. 800x600 looked screwed up for some reason, but it's no biggie.
This is what the system currently looks like...
July 2007 - Frontends
The system would need a frontend - that is, a touchscreen-friendly shell to encapsulate the basic functions like media management and navigation.
After testing about 20 different frontends, it came down to two which had both the functionality and the looks:
 Road Runner
Pros:
- Open source
- Free
- Widely community-supported and extended
Cons:
- Has a "homebrewish" feel, both operation- and design-wise
 Centrafuse
Pros:
- Professional look and feel
- Comes with SDK
Cons:
- Expensive!
- Missing one important feature: a trackbar for instantly skipping to any point in media files
Centrafuse seems like a winner, but we'll see after some real life testing..
See more alternatives and detailed discussions at the
mp3car forums.
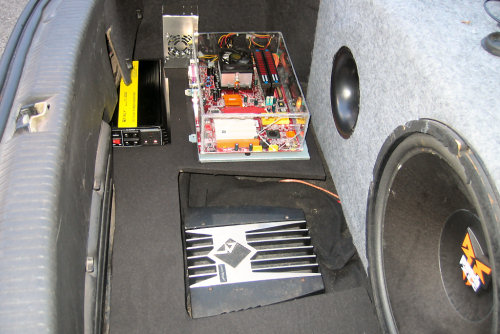
July 2007 - Installation, trunk
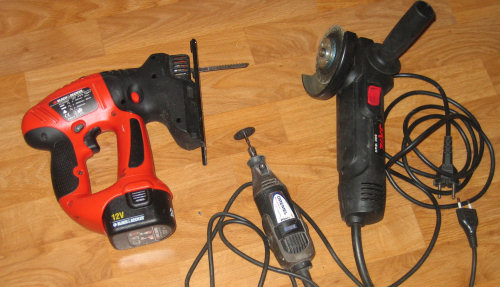
Then came the dirty work. Tools of the trade:
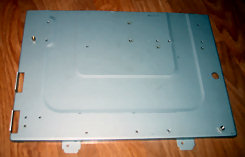
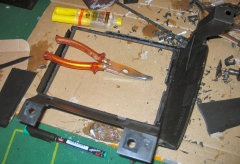
 Computer housing
The mainboard was simply mounted on a backplate from a regular housing, which was cut down to minimum size. It also happened to have some mounting holes along the edge for fastening it to the base.
The housing was epoxied together from plexiglass, which was dremeled to accommodate the IO, power cords and fan afterwards.
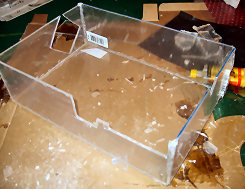
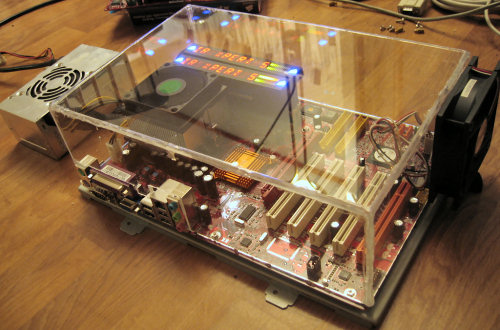
The complete unit, shiiiny:
 Trunk
Trunk
One big piece of 16mm plywood was compass sawed to fit into the trunk (almost) perfectly, then covered in black fabric. The 'puter, PSU and inverter will simply be screwed onto it.
Here's the first trial installation:
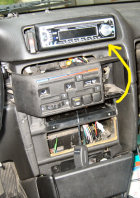
July 2007 - Installation, dash
Then came the challenge of fitting the screen into the dash somehow, while keeping the old headunit accessible.
There was an air vent I've never used in the top center console, which was almost a perfect fit for the headunit, so it was moved up a couple of spots.
This left a double-din-and-then-some room for the lilliput, and a big plastic piece which would have to be cut down to hold it.

A combination of dremel, epoxy, and duct tape (it holds the universe together) finally resulted in a good, tight fit:
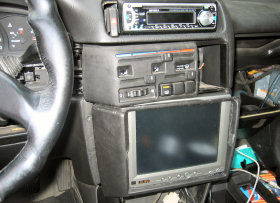
Now we're getting somewhere!
The trial fitting looks okay, considering the reversible nature of the project. (.. Which means no bondo/glue/cutting/whatever on the screen itself).
It's dropped in there completely intact.
July 2007 - Peripherals and problems
All looks good to go, car-wise, so back to system building.
GPS
A friend was nice enough to "lend" me his bluetooth GPS indefinitely, a Cellink BTG-7000. Cheers Asbjørn!
However, bluetooth on XP is.. well, interesting. I would pair it up, it would start pushing GPS data, the suddenly the data would stop coming in after a few minutes.
The bluetooth manager in XP shows the unit as "connected" some times, and some times not (even though GPS data is still being received). Hence, I had no way of knowing whether it had disconnected or just lost satelite lock.
My theory is that it went into powersaving of some kind, even though it doesn't make sense when it's hooked up to a charger.
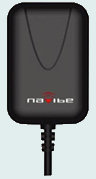
After a few days I gave up looking for a solution, and broke the projects first rule: I bought a cheap Navibe GM-720 USB GPS.
It's awesome. It'll lock on to 10-12 satelites, partially covered in the trunk, before the computer has even finished booting up. Reestablishing locks after going through a tunnel is done in seconds. I'm guessing this can be attributed to the highly praised SiRF Star III chipset.
I never did find a solution to keeping the bluetooth-gps "alive", but feel free to satisy my curiosity by emailing me suggestions.
Booting up with 2 USB sticks
By now, I was booting from one USB stick and storing media on another. A strange problem occured: the 'puter would boot quickly with only the boot-stick inserted, but if the media stick was left in, it would hang for several minutes right before explorer started up.
I looked high and low for solutions. Maybe windows tried to initialize the media stick somehow? Maybe the problem was that the media stick had been bootable before (and was probably still so), and something, somewhere got confused?
Then, a friend came by, and casually pointed out something I'd missed: whenever the media stick was inserted during boot, it'd be designated C:, and the boot stick designated D:.
There's a key in the registry - HKLM\System\MountedDevices - which keeps track of drive letters. It was a bloody mess, several identical keys with different letters, and so on.
"Try swapping the physical sticks", he suggested, so I did.
It turned out that windows maps drive letters according to the order they're enumerated by the bios, and the bios enumerated them according to the physical port they were connected to. Stick swap = perfect system! (Thanks, Henning.)
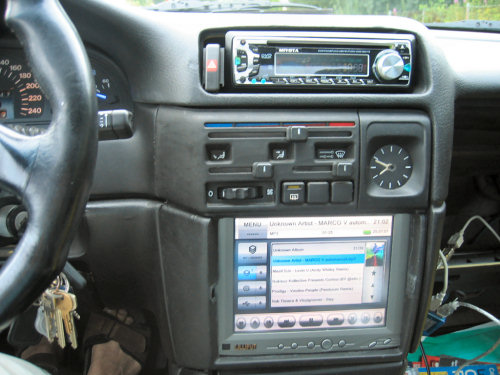
July 25, 2007 - It lives!
It's officially in the car, and it works :)
The glove compartment and other covers won't be reassembled, and some small damage won't be fixed until a few new kinks have been worked out though, in case it has to be taken back out.
This is the current setup:
Power inverter and PSU
Computer
> Lilliput 8" VGA
> Corsair Flash Voyager GT USB stick (boot)
> USB hub #1
- Wireless mini keyboard
- Navibe GM-720 GPS
- Billionton bluetooth adapter
> USB hub #2
- Lilliput touchscreen
- Corsair Flash Voyager USB stick (media)
- Icemat soundcard
- Old headunit
Current todo-list:
- The touchscreen has a tendency to "forget" it's calibration settings if left without power for a little while. Does anyone have any insight into how and where lilliput's store their calibration? Is there a way to make it "not forget" the settings, or maybe re-insert the settings programatically with a startup script of some kind?
- Time from ignition on to music starts playing is at ~1 minute right now. According to bootvis, most of the time XP boots is spent loading "usbstor"/"usbhub" drivers. I *do* have loads of USB-stuff hooked up, but does anyone know a way to speed this up?
- The screen currently gets power from the car's 12v directly. With the screen connected to the computer, I can currently choose crackling noise, or I can earth the computer to the car and hear a slight alternator whine instead. I'll try removing the computer-car earthing, and feeding the display clean 12v from the PSU instead (removing the lilliput's "egg" filter in the process). Hopefully that will remove all noise..
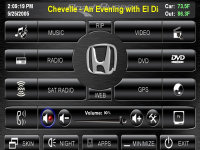
Current photo, trying out centrafuse for now:
July 30, 2007 - One down..
Solved the calibration problem! It's always something unrelated...
The regmon utility revealed that calibration settings were stored in the windows registry.
The registry contained not only one, but several calibration setups and display settings. Apparantly, the lilliput gets enumerated from scratch every time you plug it into a different USB port than the previous boot.
When the display was installed in the car, windows was EWF protected. The display was then probably plugged into another USB port than before, and hence was enumerated from scratch on every bootup. (Why I didn't have to recalibrate unless power was cut, I don't know though.. maybe the screen uses the registry in conjunction with some internal memory?)
EWF was disabled, screen calibrated, EWF enabled, and now it's all good.
July 31, 2007 - Alternator whine, ground loop?
Still getting those annoying alternator whine noises. The screen is powered from the PSU, and all the groundings have been either reinforced or merged. No two grounds have more than 2ohm between them at the moment, according to my multimeter.
I've tried grounding both the PSU's chassis, the inverter's chassis and the headunit's chassis both to common ground and directly to the motherboard, and installing several temporary fat cables between the ground points, but that made no difference. The headunit plays perfectly on its own, the only noisy signal is the one from the computer. No cables are run along the power line. I've even wrapped the USB and RCA in tinfoil!
I also tried putting a ground loop isolator on the RCA right before the headunit. It removed all the noise, but it also removed all bass and midtone, so no luck there.. At least i assume this proves the problem *is* a ground loop, that is, current flowing along the USB/RCA grounding?
A power filter right before the inverter didn't help either.
Here's a diagram of the current installation - has anyone got any input on where the noise comes from?
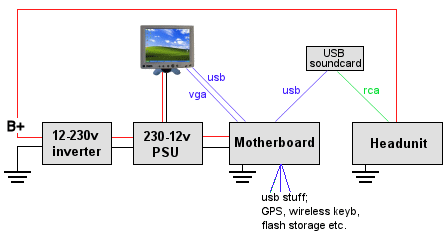
Evening update: I tried feeding the system from the in-house 220v instead of the inverter. No difference. There's still alternator whine with the engine running.
August 2007 - One more down!
Noise gone! :)
Grounding like hell wasn't enough. I needed to split open the RCA cable as close to the headunit as possible, and ground them to the chassis as well. Sounds sweet now!